
Chevrolet Trax: Repair instructions - off vehicle
Chevrolet Trax (2013-2022) Workshop Manual / Transmission / Automatic Transmission - 6T40 (MH8 MHB) / Repair instructions - off vehicle
Repair instructions - off vehicle
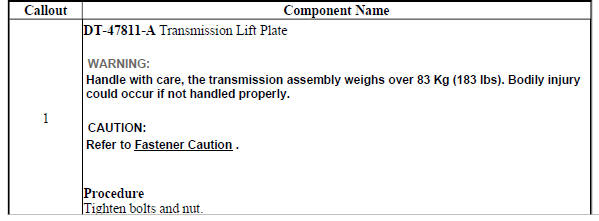
.gif)
Fig. 1: Identifying Lift Plate & Holding Fixture
Lift Plate and Holding Fixture Installation
.jpg)
TORQUE CONVERTER REMOVAL
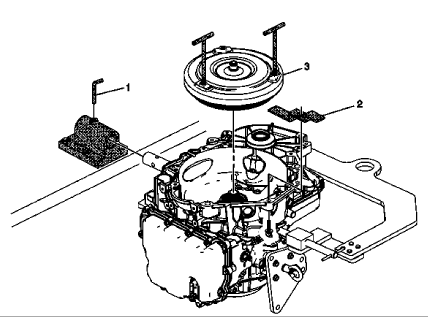
Fig. 2: View Of Torque Converter
Torque Converter Removal
.jpg)
CONTROL VALVE BODY ASSEMBLY REMOVAL
Control Valve Body Cover Removal
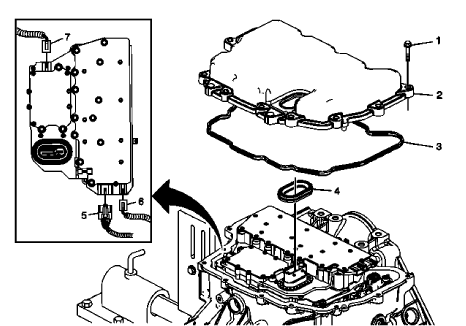
Fig. 3: View Of Control Valve Body Cover
Control Valve Body Cover Removal
.jpg)
Control Solenoid (With Body and TCM) Valve Assembly Removal
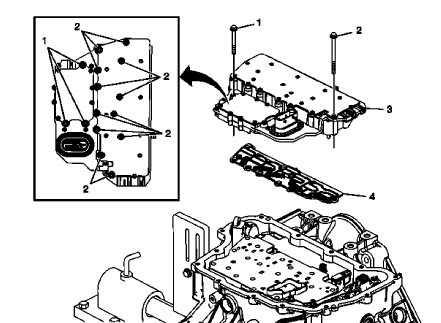
Fig. 4: View Of Control Solenoid (w/Body & TCM) Valve Assembly
Control Solenoid (With Body and TCM) Valve Assembly Removal
.jpg)
Control Valve Body Assembly Removal
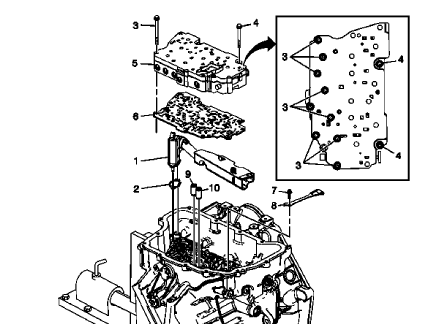
Fig. 5: View Of Control Valve Body Assembly
Control Valve Body Assembly Removal
.jpg)
- Input and output speed sensor removal
- Front wheel drive shaft seal replacement - case side
- Input, reaction, and output carrier disassemble
- Low and reverse and 1-2-3-4 clutch housing isassemble
- Drive sprocket, driven sprocket, and drive link cleaning and inspection
- Control valve body assembly assemble (gen 2)
READ NEXT:
 Input and output speed sensor removal
Fig. 6: View Of Input & Output Speed Sensor
Input and Output Speed Sensor Removal
TORQUE CONVERTER HOUSING WITH FLUID PUMP ASSEMBLY REMOVAL (NON HYBRID)
Fig. 7: View Of Torque Converter Hous
Front wheel drive shaft seal replacement - case side
Fig. 17: View Of Case Side Front Wheel Drive Shaft Seal
Front Wheel Drive Shaft Seal Replacement - Case Side
TRANSMISSION CASE CLEANING AND INSPECTION
Fig. 18: Cleaning & Inspecting Transmis
Input, reaction, and output carrier disassemble
Fig. 24: Disassembled View Of Input, Reaction & Output Carrier
Courtesy of GENERAL MOTORS COMPANY
Input, Reaction, and Output Carrier Disassemble
3-5-REVERSE AND 4-5-6 CLUTCH HOUSING DISASSEMB
SEE MORE:
Cupholders
If equipped, pull the rear seat
armrest down to access.
Sunglasses Storage
There may be sunglasses storage
over the driver door. Pull to open.
Underseat Storage
If equipped, there is storage under
the front passenger seat. Lift the
end of the tray up and pull it forward
to open. Push it in toward
Side object system malfunction
Diagnostic Instructions
Perform the Diagnostic System Check - Vehicle prior to using this
diagnostic procedure.
Review Strategy Based Diagnosis for an overview of the diagnostic
approach.
Diagnostic Procedure Instructions provides an overview of each
diagnostic category.
Diagnostic Fault
© 2019-2026 Copyright www.chevtrax.com
