Chevrolet Trax: Rear brake caliper bracket replacement
Removal Procedure
WARNING: Refer to Brake Dust Warning .
- Raise and support the vehicle. Refer to Lifting and Jacking the Vehicle .
- Remove the tire and wheel assembly. Refer to Tire and Wheel Removal and Installation .
- Remove the rear brake caliper. Refer to Rear Brake Caliper Replacement.
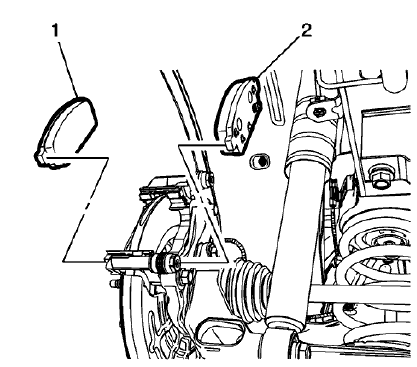
Fig. 50: Disc Brake Pads
- Remove the outer brake pad (1).
NOTE: The inner brake pad is equipped with the wear sensor.
- Remove the inner brake pad (2).
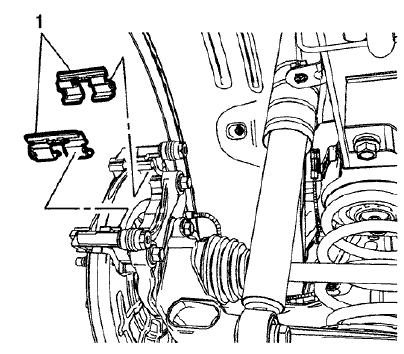
Fig. 51: Lower Brake Pad Springs
- Remove the upper and lower brake pad springs (1).
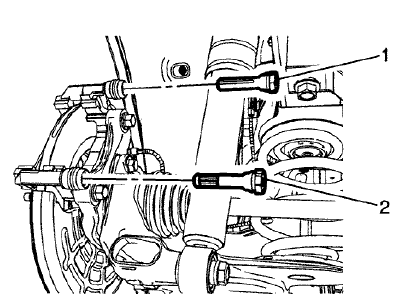
Fig. 52: Upper Brake Caliper Guide Pin
- Remove the upper brake caliper guide pin (1).
NOTE: The lower brake caliper guide pin is equipped with a bushing and must be installed in the same location.
- Remove the lower brake caliper guide pin (2).
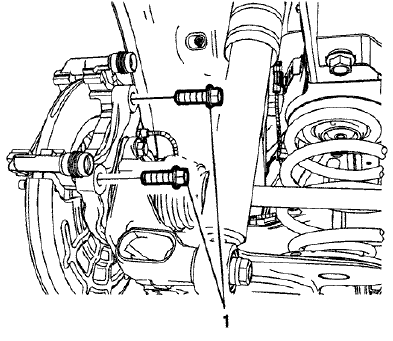
Fig. 53: Brake Caliper Bracket Bolts
NOTE: Do not reuse the brake caliper bracket bolts.
- Remove and discard the brake caliper bracket bolts (1).
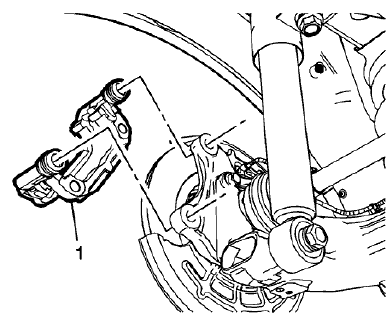
Fig. 54: Rear Brake Caliper Bracket
- Remove the rear brake caliper bracket (1).
Installation Procedure
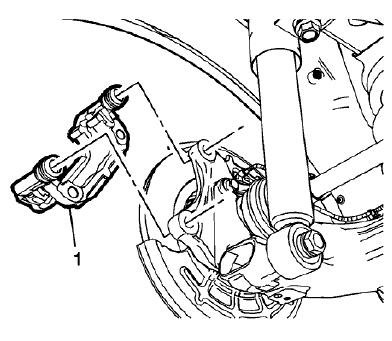
Fig. 55: Rear Brake Caliper Bracket
- Install the rear brake caliper bracket (1).
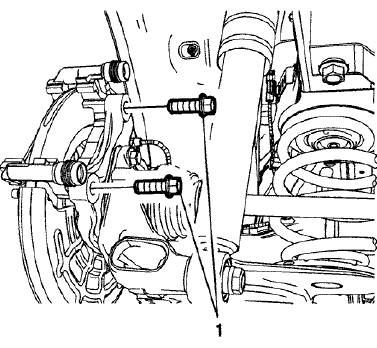
Fig. 56: Brake Caliper Bracket Bolts
CAUTION: Refer to Fastener Caution .
- Install new brake caliper bracket bolts (1) and tighten to 100 (74 lb ft).
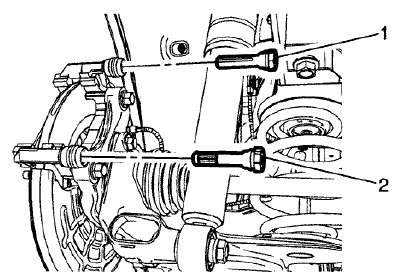
Fig. 57: Upper Brake Caliper Guide Pin
- Install the upper brake caliper guide pin (1).
NOTE: The lower brake caliper guide pin is equipped with a bushing and must be installed in the same location.
- Install the lower brake caliper guide pin (2).
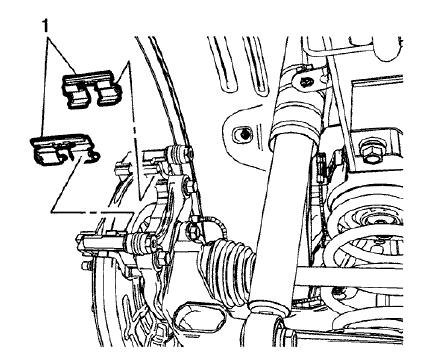
Fig. 58: Lower Brake Pad Springs
- Install the upper and lower brake pad springs (1).

Fig. 59: Disc Brake Pads
- Install the outer brake pad (1).
NOTE: The inner brake pad is equipped with the wear sensor.
- Install the inner brake pad (2).
- Install the rear brake caliper. Refer to Rear Brake Caliper Replacement.
- Install the tire and wheel assembly. Refer to Tire and Wheel Removal and Installation .
READ NEXT:
 Front brake rotor replacement
Special Tools
CH-41013 Rotor Resurfacing Kit
CH-42450-A Wheel Hub Resurfacing Kit
For equivalent regional tools, refer to Special Tools.
Removal Procedure
WARNING: Refer to Brake Dust Warning .
Rear brake rotor replacement
Special Tools
CH-41013 Rotor Resurfacing Kit
CH-42450-A Wheel Hub Resurfacing Kit
For equivalent regional tools, refer to Special Tools.
Removal Procedure
WARNING: Refer to Brake Dust Warning .
Front brake shield replacement
Removal Procedure
WARNING: Refer to Brake Dust Warning .
Raise and support the vehicle. Refer to Lifting and Jacking the Vehicle
.
Remove the front tire and wheel assembly. Refer to Tire and Whee
SEE MORE:
Where Are the Airbags? (Mexico)
The driver frontal airbag is in the
center of the steering wheel.
The front outboard passenger
frontal airbag is in the passenger
side instrument panel.
Driver Side Shown, Passenger Side Similar
If the vehicle has seat-mounted side
impact airbags for the driver and
front outboard passenger, the
Door ajar indicator malfunction
Diagnostic Instructions
Perform the Diagnostic System Check - Vehicle prior to using this
diagnostic procedure.
Review Strategy Based Diagnosis for an overview of the diagnostic
approach
Diagnostic Procedure Instructions provides an overview of each
diagnostic category
Diagnostic Fault In
