Chevrolet Trax: License Plate Lamp
.gif)
Lamp Assembly
.gif)
Bulb Assembly
To replace one of these bulbs:
- Push the left end of the lamp assembly toward the right.
- Turn the lamp assembly down to remove it.
- Turn the bulb socket (1) counterclockwise to remove it from the lamp assembly (3).
- Pull the bulb (2) straight out of the bulb socket (1).
- Push the replacement bulb straight into the bulb socket and turn the bulb socket clockwise to install it into the lamp assembly.
- Turn the lamp assembly into the lamp assembly opening engaging the clip side first.
- Push on the lamp side opposite the clip until the lamp assembly snaps into place.
Replacement Bulbs
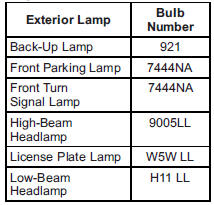
For replacement bulbs not listed here, contact your dealer.
READ NEXT:
 Electrical System
Overload
Electrical System
Overload
The vehicle has fuses and circuit
breakers to protect against an
electrical system overload.
When the current electrical load is
too heavy, the circuit breaker opens
and closes, protecting the circui
Engine Compartment Fuse
Block
To remove the fuse block cover,
squeeze the clip and lift it up.
Caution
Spilling liquid on any electrical
component on the vehicle may
damage it. Always keep the
covers on any electrical
component.
SEE MORE:
Water outlet replacement (LUJ, LUV)
Removal Procedure
Drain the cooling system. Refer to Cooling System Draining and Filling.
Remove the charge air cooler outlet air hose from the throttle body.
Refer to Charge Air Cooler Outlet
Air Hose Replacement .
Remove the engine coolant air bleed hose from the water outlet. Refer to
En
Brake system vehicle road test
Preliminary Inspections
Visually inspect easily accessible brake system components for obvious
damage and/or leaks which may
indicate that the vehicle should not be driven until further inspections
have been completed.
Inspect the brake master cylinder reservoir fluid level and adjust only
© 2019-2026 Copyright www.chevtrax.com
