Chevrolet Trax: Floor coverings and headlinings - Installation Procedure
Chevrolet Trax (2013-2022) Workshop Manual / Accessories & Equipment / Floor Coverings and Headlinings / Floor coverings and headlinings - Installation Procedure
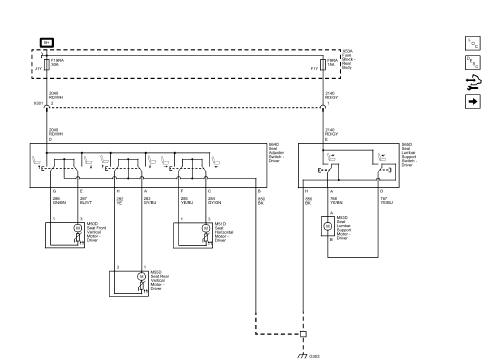
Fig. 92: Headliner Trim Panel Retainers
- With the aid of an assistant, position the headliner trim panel assembly (2) into the vehicle through the liftgate opening.
- Connect the electrical connectors to the headliner trim panel assembly (2).
- Tape any unused connectors to the headliner with a high adhesive tape.
- Install the 3 headliner trim panel retainers (1).
.jpg)
Fig. 93: Body Lock Pillar Upper Trim Panel
- Install the body lock pillar upper trim panel (3). Refer to Body Lock Pillar Upper Trim Panel Replacement .
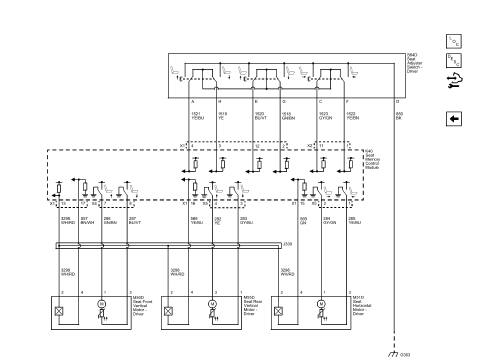
Fig. 94: Center Pillar Upper Trim Panel Assembly
- Install the center pillar upper trim panel assembly (3). Refer to Center Pillar Upper Trim Panel Replacement (Trax) .
.jpg)
Fig. 95: Rear Seat Position Center Courtesy Lamp
- Install the rear seat position center courtesy lamp (1). Refer to Rear Seat Position Center Courtesy Lamp Replacement .
.jpg)
Fig. 96: Roof Console Assembly
- Install the roof console assembly (2). Refer to Roof Console Replacement .
.gif)
Fig. 97: Windshield Outside Moisture Sensor Cover
- Install the windshield outside moisture sensor cover (1). Refer to Windshield Outside Moisture Sensor Cover Replacement (Trax) .
.gif)
Fig. 98: Roof Rail Front Stowage Compartment
- Install the roof rail front stowage compartment (2). Refer to Roof Rail Front Stowage Compartment Replacement (Trax) .
.gif)
Fig. 99: Roof Rail Rear Assist Handle Assembly
- Install the roof rail rear assist handle assembly (2). Refer to Roof Rail Rear Assist Handle Replacement (Trax) .
.gif)
Fig. 100: Roof Rail Assist Handle Assembly
- Install the roof rail assist handle assembly (2). Refer to Roof Rail Assist Handle Replacement (Trax) .
.gif)
Fig. 101: Sunshade Support Assembly
- Install the sunshade support assembly (2). Refer to Sunshade Support Replacement (Trax) .

Fig. 102: Sunshade Assembly
- Install the sunshade assembly (3). Refer to Sunshade Replacement (Trax) .
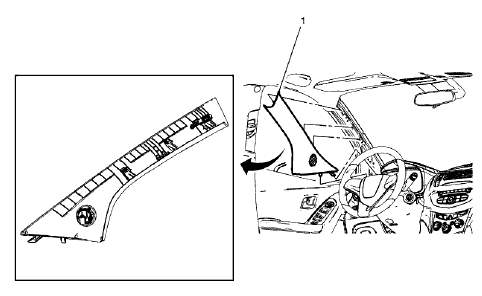
Fig. 103: Windshield Garnish Molding Assembly
- Install the windshield garnish molding assembly (1). Refer to Windshield Garnish Molding Replacement (Trax) .
- Enable the SIR system. Refer to SIR Disabling and Enabling .
READ NEXT:
 Instrument Panel and Console Trim - Repair instructions
SPECIFICATIONS
FASTENER TIGHTENING SPECIFICATIONS
Fastener Tightening Specifications
REPAIR INSTRUCTIONS
INSTRUMENT PANEL LOWER TRIM PANEL INSULATOR REPLACEMENT
Fig. 1: Instrument Panel Lower Trim
Instrument panel upper trim panel replacement (trax)
Removal Procedure
Remove the instrument panel assembly. Refer to Instrument Panel Assembly
Replacement (Trax).
Remove the windshield defroster outlet duct. Refer to Windshield
Defroster Outlet
SEE MORE:
Front disc brake mounting and hardware inspection
WARNING: Refer to Brake Dust Warning .
Fig. 10: Exploded View Of Brake Pads And Brake Caliper Mounting Bracket
Inspect the fluid level in the brake master cylinder reservoir.
If the brake fluid level is midway between the maximum-full point and
the minimum allowable level then
no brake fluid
DTC B3883
Diagnostic Instructions
Perform the Diagnostic System Check - Vehicle prior to using this
diagnostic procedure.
Review Strategy Based Diagnosis for an overview of the diagnostic
approach.
Diagnostic Procedure Instructions provides an overview of each
diagnostic category.
DTC Descriptors
D
© 2019-2026 Copyright www.chevtrax.com
