Chevrolet Trax: Exterior Mirrors
Convex Mirrors
Warning
A convex mirror can make things, like other vehicles, look farther away than they really are. If you cut too sharply into the right lane, you could hit a vehicle on the right. Check the inside mirror or glance over your shoulder before changing lanes.
The passenger side mirror is convex shaped. A convex mirror's surface is curved so more can be seen from the driver seat.
Power Mirrors
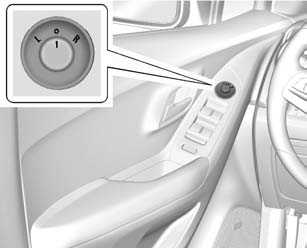
To adjust the mirrors:
- Turn the selector switch to L (Left) or R (Right) to choose the driver or passenger mirror.
- Move the control to adjust the mirror.
- Turn the selector switch to
 to
deselect the mirror.
to
deselect the mirror.
Folding Mirrors
Manual Folding Mirrors
If equipped the outside mirrors can be folded inward to prevent damage. To fold, pull the mirror toward the vehicle. Push the mirror outward to return it to the original position.
Heated Mirrors
For vehicles with heated mirrors:
 Rear Window Defogger):
Press to heat the mirrors.
Rear Window Defogger):
Press to heat the mirrors.
See "Rear Window Defogger" under Climate Control Systems
READ NEXT:
 Interior Mirrors
Interior Rearview Mirrors
Adjust the rearview mirror for a clear
view of the area behind your
vehicle.
If equipped with OnStar, the vehicle
may have three control buttons at
the bottom of the mirror
Windows
Warning
Never leave a child, a helpless
adult, or a pet alone in a vehicle,
especially with the windows
closed in warm or hot weather.
They can be overcome by the
extreme heat and suffer
permanent in
Roof
Sunroof
If equipped, the sunroof only
operates when the ignition is turned
to ON/RUN or Retained Accessory
Power (RAP) is active.
Open/Close: Press and hold the
front or rear of switch (1) to open o
SEE MORE:
Range selector lever cable adjustment
NOTE: Adjust the automatic transmission range selector cable while
the
transmission and the gear selector are in the Park position only. Failure to
do so may cause mis-adjustment.
Set the park brake and chock the wheels.
Verify the transmission range select lever is in the park position.
Verify
Shoulder Belt Height Adjuster
The vehicle has a shoulder belt
height adjuster for the driver and
right front passenger seating
positions.
Adjust the height so the shoulder
portion of the belt is on the shoulder
but not falling off of it. The belt
should be close to but not
contacting the neck. Improper
shoulder belt height adju
