Chevrolet Trax: Seat belt system operational and functional checks
SPECIFICATIONS
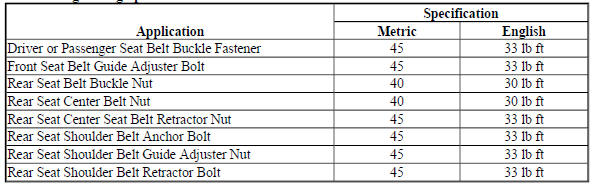
FASTENER TIGHTENING SPECIFICATIONS
Fastener Tightening Specifications
SCHEMATIC WIRING DIAGRAMS
SEAT BELT WIRING SCHEMATICS (ENCORE)
Switches and Indicator
.jpg)
Fig. 1: Switches and Indicator
SEAT BELT WIRING SCHEMATICS (TRAX)
Switches, Sensor, and Indicator
.jpg)
Fig. 2: Switches, Sensor, and Indicator
DIAGNOSTIC INFORMATION AND PROCEDURES
SEAT BELT SYSTEM OPERATIONAL AND FUNCTIONAL CHECKS
NOTE: If the vehicle has been in a collision, refer to Repairs and Inspections Required After a Collision for additional information.
Perform the following inspection from the driver seat:
- Turn the ignition switch to the ON position. Verify proper operation of the seat belt reminder lamp with the belt buckled and with the belt unbuckled.
- Inspect the shoulder belt guide in order to ensure that the following conditions are met:
- The shoulder belt guide swivels freely.
- The seat belt webbing is seated flat in the guide slot.
- The seat belt webbing does not bind.
- Verify that the seat belt buckle faces inboard and is accessible.
- Verify that the seat belt retractor units are securely attached.
- Verify that the seat belt anchor bolts are secure.
- Fully extend the seat belt webbing. Verify that the seat belt webbing does not have any twists or tears.
- Allow the seat belt webbing to retract. Verify that the seat belt webbing returns freely and completely back into the retractor. If the seat belt webbing will not retract, refer to Seat Belt Does Not Retract.
- Snap the seat belt latch plate into the buckle.
- Sharply tug on the seat belt latch plate and the buckle. Verify that the seat belt latch plate and the buckle remain locked when tugged.
- Push the button on the buckle:
- Verify that the seat belt latch plate releases easily from the buckle.
- Verify that the button returns to its original position.
Perform the following inspection procedure from the passenger seat.
- Verify the automatic locking retractor (ALR) feature operates properly by performing the following checks:
- Pull the seat belt all the way out of the retractor until it stops.
- Slowly allow the belt to retract partially, while listening for a ratcheting sound.
- Sharply tug on the belt ensuring that the retractor lock sets and does not allow the belt to be pulled from the retractor.
- After performing steps 1.1 through 1.3 ensure the belt fully retracts.
- Repeat the inspection procedure steps 2 through 10 from the passengers seat.
Perform the following steps in order to inspect the left and right rear seat belts:
- Inspect the shoulder belt guide in order to ensure that the following conditions are met:
- The seat belt webbing is seated flat in the guide slot.
- The seat belt webbing does not bind.
- Verify that the seat belt buckle is accessible.
- Verify that the seat belt retractor units are securely attached.
- Verify that the seat belt anchor bolts are secure.
- Fully extend the seat belt webbing. Verify that the seat belt webbing does not have any twists or tears.
- Allow the seat belt webbing to retract. Verify that the seat belt webbing returns freely and completely back into the retractor.
- Snap the seat belt latch plate into the buckle.
- Sharply tug on the seat belt latch plate and the buckle. Verify that the seat belt latch plate and the buckle remain locked when tugged.
- Push the button on the buckle:
- Verify that the seat belt latch plate releases easily from the buckle.
- Verify that the button returns to its original position.
Emergency Locking Retractors
WARNING: Perform this test in an area clear of other vehicles or obstructions. Do not conduct this test on the open road. A large, empty parking lot is suitable.
Failure to observe this precaution may result in damage to the vehicle and possible personal injury.
- Fasten the seat belts, an assistant is needed when the retractor under test is not part of the driver seat belt.
- Accelerate the vehicle slowly to 16 km/h (10 mph) and apply the brakes firmly.
- Verify that the seat belt locks when braking firmly.
NOTE: When performing this check, note the position that the retractors are mounted. Some retractors are not mounted at a zero degree inclination.
- If the belt does not lock, proceed with the following steps:
- Remove the seat belt retractor assembly.
- Tilt the seat belt retractor slowly.
.gif)
Fig. 3: Checking Seat Belt Retractor Inclination
- Ensure that the seat belt webbing can be pulled from the retractor at an inclination of 15 degrees forward or less, from the retractors mounted position.
- Ensure the retractor cannot be pulled from the retractor at an inclination of 45 degrees forward or more.
- If a seat belt retractor does not operate as described, replace the retractor assembly.
DIAGNOSTIC CODE INDEX
DIAGNOSTIC CODE INDEX
.jpg)
READ NEXT:
 DTC B0072 OR B0073: Seat belt switch
Diagnostic Instructions
Perform the Diagnostic System Check - Vehicle prior to using this
diagnostic procedure.
Review Strategy Based Diagnosis for an overview of the diagnostic
approach.
Diag
DTC B059A: Seat belt indicator circuit
Diagnostic Instructions
Perform the Diagnostic System Check - Vehicle prior to using this
diagnostic procedure
Review Strategy Based Diagnosis for an overview of the diagnostic
approach.
Diagn
Symptoms - seat belts
NOTE: Review the seat belt system description and operation in
order to familiarize
yourself with the system and how it functions. Refer to Seat Belt System
Description and Operation.
Visual/Physical
SEE MORE:
Cylinder head cleaning and inspection
Special Tools
EN-6216 Gauge
EN-6216-200/300/400 Gauge Instruments
For equivalent regional tools refer to Special Tools.
Cleaning Procedure
Remove any old thread sealant, gasket material or sealant.
Clean all cylinder head surfaces with non-corrosive sealant.
WARNING: Refer to Safety Glasses
Brake warning indicator malfunction (WITHOUT J41)
Diagnostic Instructions
Perform the Diagnostic System Check - Vehicle prior to using this
diagnostic procedure.
Review Strategy Based Diagnosis for an overview of the diagnostic
approach.
Diagnostic Procedure Instructions provides an overview of each
diagnostic category.
Diagnostic Fault
